DIY Glitter Heart Votives
What You’ll Need:
Glass jar
Glitter of any preferred colour
Spray glue
Scissors
Sharpies
Any sticky paper
Pencil
Colourful beads
Flameless LED light candles
Steps:
1. To start off, take your sticky paper ( which should be unpeeled) and draw a large heart
2. Cut out the heart and peel of the back to stick it onto the inside of your jar, pressing it down firmly to ensure no holes
3. Now spray your spray all over the inside of your jar.
4. Now pour some glitter into the jar.
5. Screw the lid back on tightly and shake the jar until the inside is completely covered in the glitter.
6.Once the inside is completely covered, take the lid of and pour out any left over glitter.
7. Now its time to remove the heart sticker.
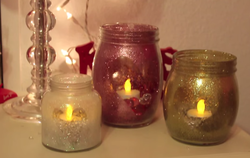
8. It is best to use a pencil by digging under the sticker and slowly rip it off. Once the sticker is removed you should now have something similar to what is displayed in the image.
Glass jar
Glitter of any preferred colour
Spray glue
Scissors
Sharpies
Any sticky paper
Pencil
Colourful beads
Flameless LED light candles
Steps:
1. To start off, take your sticky paper ( which should be unpeeled) and draw a large heart
2. Cut out the heart and peel of the back to stick it onto the inside of your jar, pressing it down firmly to ensure no holes
3. Now spray your spray all over the inside of your jar.
4. Now pour some glitter into the jar.
5. Screw the lid back on tightly and shake the jar until the inside is completely covered in the glitter.
6.Once the inside is completely covered, take the lid of and pour out any left over glitter.
7. Now its time to remove the heart sticker.
8. It is best to use a pencil by digging under the sticker and slowly rip it off. Once the sticker is removed you should now have something similar to what is displayed in the image.
Fancy Floral Jar

What You’ll Need:
1x packet of Water Bubbles
1x container or vase
Any colour of food colouring
Some plastic flowers
1x pair of scissors
Steps
1.Pour your packet of water bubbles into your vase
2.Squeeze about 4 drops of food colouring into your water bubbles and with this you are going to mix it around, making sure the colour spreads all over the water bubbles
3.Wait about 5 minutes for it to dry out and then rinse out the excess food colouring
4.Now taking you plastic flowers, cut them to your preferred length to fit it inside the jar
5.Bend the ends of the flowers and place them inside the jar. Now you are finished with your beautiful floral decoration.
Illuminating Candle

What You’ll Need:
Any small glass container
1x packet of accent gems
1x any one wick candle you prefer
Steps:
1. start by laying 2 layers of accent gems on the bottom of your container. Don't place too many in at the same time as you want the layer to be even.
2. Place your candle inside the jar and fill the sides of your candle with the rest of the accent gems. Make sure each side has an even layer.
3. The last step is to light your candle and your DIY project is finished!
Luxurious Hallway Tray

What you’ll Need:
Any chosen picture
1x Picture frame
1x Gold paint
1x roll of painters tape
1x paintbrush
1x sponge paintbrush
1x pair of scissors
Steps:
1. First take you picture frame and remove the glass piece
2. Trace the glass piece onto your picture to get the fitted shape of your picture. Cut the picture out and set that aside
3. Now taking your painters tape, stick the tape across the edges of your glass piece to protect it from the paint. Then place it back inside the frame.
4. It is now time to paint the frame. Make sure to cover all edges and the corners. After it has dried paint a second coat and let that dry.
5. Take out the glass from the frame and remove the tape
6. Now place your glass piece and picture in the frame and close it up
7. You are now finished with your project. Remember you can use this as a decorative piece for your house. It is handy to place it on a hallway table as a go-to essentials tray. You may want to place your watches, phones and keys, so you can grab and go.
D.I.Y Cupcake liner Floral Gland
What you’ll need:
Candle Stick Holder
1x Large Foam Sphere
2x packets of cupcake liners
1x 250 pack of beading pins or toothpicks
A hot glue gun
Steps:
1. Starting with your candle stick holder, apply an even amount of glue around the rim of the top and stick your foam sphere down on top, firmly pressing it down and holding it for about 1 minute
2. To start create the flower bouquet. Take one of the cupcake liners and a beading pin. Stick the beading pin through the centre of the cupcake liner which should be facing the right side up.
3. Fold the cupcake liner in half and fold it in half again.
4. To stick it down apply glue to the bottom of the cupcake liner and stick it down into the foam sphere
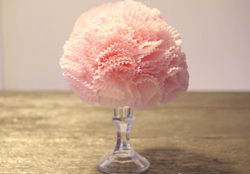
5. Repeat steps 2, 3 and 4 until your foam ball is completely full of the cupcake liners. It should look similar to this.
Candle Stick Holder
1x Large Foam Sphere
2x packets of cupcake liners
1x 250 pack of beading pins or toothpicks
A hot glue gun
Steps:
1. Starting with your candle stick holder, apply an even amount of glue around the rim of the top and stick your foam sphere down on top, firmly pressing it down and holding it for about 1 minute
2. To start create the flower bouquet. Take one of the cupcake liners and a beading pin. Stick the beading pin through the centre of the cupcake liner which should be facing the right side up.
3. Fold the cupcake liner in half and fold it in half again.
4. To stick it down apply glue to the bottom of the cupcake liner and stick it down into the foam sphere
5. Repeat steps 2, 3 and 4 until your foam ball is completely full of the cupcake liners. It should look similar to this.
D.I.Y Sharpie Message mug

What you’ll Need:
Sharpie
Mug
Steps:
1. First, taking your mug, write any message onto it with your sharpie. You can also try creating a design on your mug aswell
2. Now place your mug in the oven and bake it on 200 degrees for 1
hour
3. Once it’s done, let it cool down for a bit and then you have you DIY sharpie mug!
Vintage Mason Jars

These vintage mason jars are a great home décor piece to give your home a vintage look. They are very easy to make as well and will glamour up space.
What You’ll Need:
Paint in any colour
Paintbrush
Mason Jar
Flowers
Sand paper
Steps:
1. Take your mason jar and take of the lid. Paint the entire jar in your preferred colour
2. Once it has dried, take you sand paper and scrub it a bit on the edges, taking of a bit of paint to give it a rustic look
3. You are now done with your jar and it’s time to add the flowers. Measure how long you would like the flowers to be and cut them to size. Now just place the flowers in and your mason jar is ready to shine.
